Illusion
De PowRO - Wiki
Ir a la navegaciónIr a la búsqueda
Refers to episodic 17.1-related content. For the smaller mini-content dungeons, see Illusion Dungeons
Main Quest
Starting the Illusion Quest
| Illusion/en | |
|---|---|
| Requirements | |
| Base Level: | 110 |
| Quest Prerequisite(s): | Terra Gloria |
| Rewards | |
| Base Experience: | Multiple |
| Job Experience: | Multiple |
| Item(s): | Multiple |
This follows right after the Werner Lab raid as the Rebellion continue their investigation.
- In your personal room in the Prontera castle, speak to Nihil .
- Proceed to Einbech and go to the front of the Clana Nemieri Rebel base.
- Talk to Rebellion Member /navi einbech 218/80 who's standing outside the entrance. He tells you of the Rebellion's new base expansion and gives you coordinates to the new building in Einbroch.
- Head to Einbroch secret pub in the northeast corner, Cat on Bullet /navi einbroch 302/328 .
- Enter the Cat on Bullet and look for Philopontes (Tes) in the north-eastern-most room. He tells you about the information they gathered from the Werner Lab raid. The players new task will be investigating a nearby abandoned mine.
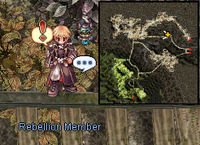
- Walk one north and one east of Einbroch to find a Rebellion Member /navi ein_fild05 156/288 on lookout there at the entrance to Rudus. (do not wing, just walk along the rail).
- Enter Rudus by talking to the Rebellion Member.
- Rudus Dungeon will now be freely accessible by talking to this NPC.

Rudus Investigation
| Illusion/en | |
|---|---|
| Requirements | |
| Base Level: | 110 |
| Hunting: | 10 Dolor 10 Venenum 10 Twin Caputs |
| Rewards | |
| Base Experience: | 800,000 Base EXP |
| Job Experience: | 800,000 Job EXP |
| Item(s): | 15x |
| Quest Reward(s): | My Name is Morning Access to Rudus Dungeon: - Laboratory Waste Disposal Plant Rudus Floor 1 - Laboratory Waste Disposal Plant Rudus Floor 2 - Laboratory Waste Disposal Plant Rudus Floor 3 |
.
.
Entering this map immediately grants the player access to all 3 floors of Rudus Dungeon, and My Name is Morning since Teleport is allowed inside.
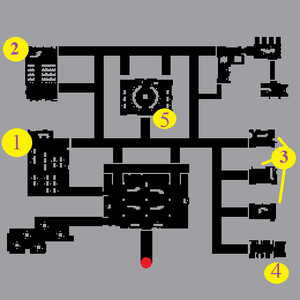
- Talk to Elena Volkova near the mining facility entrance on the inside. She says the investigation will take longer than expected after the discovery of a suspiciously-erected wall.
- Talk to Rookie located directly south of Elena. He tells the player their progress is blocked by a large 3-layer door and needs help investigating it. He tasks the player to investigate around the wall for other means of entry. They're all given yellow + marks on the mini-map.
- Wall on the Railroad - Rebellion Member to the East. He deduces that the wall was built after the refinery was no longer under operation after noticing how it cuts across the railroad instead of around it.
- Watchtower - Rebellion Member to the West. He says that the pillar beside the wall was actually a watchtower after climbing it and mentions that he noticed lots of movement on the other side of the wall.
- Small Hole - Notice a Small Hole along the western edge of the map that looks like it was made my a small animal.
- Report the findings back to Rookie. Meanwhile, Rookie was able to unlock the door but discovered it was designed with a weird mechanism: someone has to keep holding the button to keep it open. He points out that the odd design was probably meant to contain what was on the other side, as he has only ever seen similar mechanics used in prisons and penitentiaries.
- Ominous Noise is heard from the other side of the door. Since Rookie has to stay behind, the player is asked to investigate instead. Click Closed Gate to go through. Hunt:
- 10 Dolor
- 10 Venenum
- 10 Twin Caputs
- Optional: Go to the yellow mark on the map to unlock Learning Morning daily quest, written in the section below.
- Report the presence of monsters back to Rookie who confirms that the wall was designed for containment of those monsters as he expected.
- Walk north to relay all the uncovered info back to Captain Elena Volkova and the player is rewarded with two bundles of experience. Each of 400,000 Base EXP and Job EXP, and 15 Cor Core.
- Report back to Cat on a Bullet Cat Cafe in Einbroch and talk to Tes . After explaining everything to him, he thinks it may be a secret dump site for failed test subjects.
Learning about Morning
- The player discovers a small child while in the Rudus Dungeon at the yellow mark on the map.
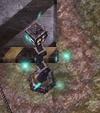
- The child doesn't say anything, so the player investigates the area to find out why. They observe a pile of scrap nearby /navi sp_rudus 124/195 and Dig through it.
- The pile of scrap reveals a letter introducing us to Morning. If you wish to feed Morning, he eats 10 of the requested item.
- From now on, the daily mission "My Name is Morning" from Illusion is available.
Securing Regenschirm
| Illusion/en | |
|---|---|
| Requirements | |
| Base Level: | 110 |
| Hunting: | Sorrow Crob |
| Rewards | |
| Base Experience: | 1,000,000 Base EXP |
| Job Experience: | 800,000 Job EXP |
| Item(s): | 25x |
- Tes tells the player of an unexpected guest in the back room. Proceed to the back room by talking to the Rebellion Retiree who is standing nearby, to the right of Tes.
- Inside, talk to Tes first.
- The player meets Kaya Tos (Middle-aged Gentleman), Aas(Senior Rekenber Guard), and Est Loveroy. Long dialogue follow explaining that Rekenber's annex lab, Regenschirm, was occupied by assailants that looked like Heart Hunters under the command of someone named Chelin, a former captain of rekenber's security team.
- Then talk to Middle-aged Gentleman Kaya. He request that you help Est in reclaiming the lab.
- Go to Lighthalzen. Look at the mini map, go to the the left-hand building of Rekenber's HQ and speak to Republic Guard , where Aas' Rekenber Guards and Est will be preparing.
Regenschirm Instance
- This instance is not recommended for characters who are not damage dealers (such as Arch Bishops without Adoramus or Judex) and they should ask for help before creating the instance.
- The instance can be created, entered, destroyed as many times needed until final boss is defeated.
- Instance Time Limit: 1 hour
1: Go to the Cafeteria
- Talk to Rekenber Guard Oscar to enter the building (Instance) to hunt Sorrow Crob
- Go north and talk to Aas to open the door, who realizes that she can also support the player through the system by using the same control panel. When ready, talk to her to proceed to other side of the door.
- Once inside, head northwest and proceed through the half open doorway. This goes up a straight flight of stairs to the employees' cafeteria.
- The room is highly populated with Traitors (dressed as Heart Hunters) but it is not necessary to eliminate all of them.
- You'll find 3 Researchers in the cafeteria being held captive. Eliminate the Traitors to set them free.
- Once the cafeteria is clear, communicate with Aas by using the Access Controller on the right near the large door.
- One of the Researchers will offer to help open the door for the player since biometrics data is required. Walk through it once opened.
2: Go to the Lecture Room
- Find the lecture room north of the cafeteria door entrance by proceeding north through the nearby hallway. The rebellion has locked themselves inside to protect themselves from the Poison Gas.
- Eliminate all the Poison Gas monsters outside both doors of the lecture hall to enter.
- After all the gas is gone, Est will call out to the player. Talk to Est in the northern end of the lecture hall.
- She instructs the player to relay a message to Aas by using a given code on any nearby communication device. Luckily, there's one Access Controller beside the blackboard nearby. Talk to it and use Code 0315.
3: Go Save the Detained Researchers
- While inside the main hallway, fight through groups of Fatal Pompoms and Traitors and head straight along the path to a series of rooms on the other end of the hallway and then to the south. All the Fatal Pompoms in this vicinity must be killed to enter the portals.
- Talk to Detained Researchers in each of the 3 rooms.
- When trying to enter the 4th room, a message is broadcasted asking for support to come to the lecture room.
4: Go to 4th Room
- Aas mentions to go check the Guard's Waiting Room (4th room at the end of the hallway from earlier) in the bottom right corner of the instance. You will find Aas who has found the spare master key. (1@rgsr 235, 44)
- Collect the scattered document on top of the nearby drawer to activate the Data Obtained from the Lab quest.
5: Go to Central Meeting Room
- Head to Central Meeting Room (1@rgsr 125, 157) at the main inner hallway. Re-unite with Est and Goni.
- Speak to Aas who appeared and wait until they finish talking. Then talk to Aas again to enter the room.
- Walk north to find Restrained Test Subject.
- Investigate the Controllers around the central room in the following order. Press the Color of the Button that matches the color of the light aura.
- Top Right Panel = Blue Aura = Blue Button
- Bottom Left Panel = Red Aura = Red Button
- Bottom Right Panel = White Aura = White button
- Controller beside Top Left door = Yellow Aura = Yellow Button
- Fight Test Subject, Sorrow Crob. She is a MVP with 3.5m hp and casts Firebolt.
- Aas finally makes her way inside just as the fight ends. She's relieved to find the player okay and offers to let the player go ahead while she cleans up. She will offer 3 options:
- Einbroch (this is the suggested choice)
- Lighthalzen (warps outside instance directly in front of Guard Oscar)
- Look around some more
- Return to Einbroch's Cat on a Bullet and find Tes who has been worried for some time because Est came back alone.
- Report to the details of what happened at Regenschirm and receive 500,000 Base Exp and 400,000 job Exp twice, and 25x
 Mysterious Component.
Data Obtained from the Lab
- After finding a pile of documents in the Guard's Waiting Room while inside Regenschirm, Aas requests the player to deliver the documents to Tes so he may investigate them.
- At the Cat on a Bullet, hand over the documents to Tes and the player receives 200,000 Base and Job Exp
Investigating Rekenber
- Next, head south and enter the right room behind Wilde NPC (Clothed like Rogue Job Sprite) and talk to Rage who is arguing with Kaya about the Rekenber investigation report and if it's trustworthy or not.
- After Rage moves booths, talk to him again, then talk to Kaya Tos, talk to Rage again (just follow the quest indicator).
- Rage got a list of names of people who've gone missing, but Kaya says that Rekenber has them on rotation and they are still employed. You try to convince them to start a joint investigation and get dragged into being the impartial witness.
- Receive 300,000 Base and Job EXP after finished talking.
- The team agreed to meet at Einbroch airport. Meet Rage who is sitting on a bench west of the airport entrance.
- After the story about how and who to investigate, you will be teleported to Lighthalzen, follow the quest mark in minimap and talk to Rage near the Slums entrance.
- You will be teleported to the slums with activated navigation, follow the path northeast and talk to Rage.
- "Patsy" has apparently been sending money back to his parents without writing any letters, and allegedly used all his vacation time despite promising his family he'd visit on his first vacation.
- Receive 300,000 Base and Job EXP.
- Now you will be teleported out of the slums, navigation will direct you to Rage in front of Rekenber entrance, talk to him.
- Enter the Rekenber office, talk to the first employee you encounter, she should have quest indicator
- In this part, you will move around the office, don't forget to click blue texts to automatically activate Navi and make it easier
- Talk to second employee then go out of the office and go to Regenschirm
- Enter Regenschirm, go right, and talk to Lab Staff behind the easternmost desk in 1st floor
- Go to bottom left room and talk to Employee .
- Go back to Rekenber Office and talk to Secretary with quest indicator, behind the left stairset.
- Go to the document's archive (blue text will trigger Navi) . Now you will be instructed to go to . It is faster to warp into Einbroch and then go north-east-north
- Speak to Kaya Tos in Ein Field 1 and receive 20x
 Cor Core and 600,000 Base and Job EXP.
Old Memories
- Go back to Cat on Bullet and speak with Philopontes .
- He will instruct you to go to 1 map north, 1 map west from Einbroch and speak with Rebellion Member there .
- You will proceed to investigate the area, just follow the Navi system to get to the specific coordinates
- You will forced to go back talking with Rebellion Member (Receive 100,000 Base and Job EXP).
- Talk to Rebellion Member again to open the gate to prepare the OS instance, then choose enter to go in.
- If you are not a damage dealer, it's suggested to bring a friend to help clear some monsters. However, it's possible to rush through the monsters.
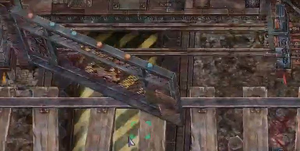
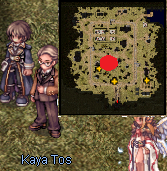
Below is map of the instance:
- Inside, talk with Ridsh, the Three Rebellion Lady will appear with some monsters. Walk over the portals and kill the monsters. Then at the right side, click the Pipe NPC, choose Destroy It to proceed.
- Walk north over the portal, follow the railway until you find Dien, talk to Dien and talk to the black portal. Take a detour until you find an opening to the north.
- Search the area for cables and click all 3 of them.
- Back to following the railway until you find Dien and Cotness. Walk to the east until you find Ridsh. Erst will come and you must proceed over the portal.
- Try to reach the quest mark on the mini-map by going north-east until you're back on the railway.
- You will fight (or ignore and rush through) some monsters from black portals along the way until you will reach the Three Rebellion Lady and Erst.
- Talk to Dien, she will instruct you to get her lucky charm back in Clana Nemieri.
- Receive 25x Mysterious Component and 600,000 Base and Job EXP.
- Receive 25x
- Go to Clana Nemieri , talk to the Rebellion at , then go into Dien's room on the far right, and click on her drawers to take her lucky charm as Dien's Envelope.
- Go back to OS, talk to Dien , and you will be teleported to Cor.
- Receive 200,000 Base EXP and 100,000 Job EXP.
- OS Occupation side quest is available now.
Helping the Workers
- Walk a bit north and talk to Advance Party .
- Talk to Kaya Tos, then Tes. The team will prompt to go to a safety place, its the middle quest mark in minimap
- Talk to Tes , then Aas will like to talk to Kaya Tos privately, walk a bit northeast and talk to Aas . Keep talking and receive 300,000 Base and Job EXP.
- Finding Patrick side quest is available now.
- Merc vs Merc repeatable quest is available now.
- Help the Farm repeatable quest is available now.
Capturing Eliumina
- Rebellion will intervene after you talk to Aas, so talk to that Rebellion on the new quest mark in minimap, a bit southwest from your position.
- Elena will appear, talk to her and proceed northeast to the new quest mark in minimap.
- Talk to Elena three times, first to trigger the quest, second to create instance, and third to enter it
- This is a solo instance that allows only one person in at a time when not in a solo party.
- When with other players, the first one to enter must be set as the leader and must be able to beat EL1-A17T on their own.
- After the first member returns, the next member to enter should be set as the leader, with the path already cleared just find and talk to Elena.
- Repeat this process until all members are done.
- Avoid closing the instance until all members are done.
- Talk to Elena inside the instance. 4 quest mark will appear, go to the 2 marks at right side. Talk to each of the boxes and kill all monsters that appear. Then talk to box again so it disappears.
- A new quest mark will appear. Go there and talk to Elena, she will open a portal to next area
- You have to fight a weakened version of a boss, EL1-A17T. Defeat it, then the Rebellion will appear with Eliumina caught.
- Talk to Elena to go out, and then talk to Elena again outside.
- Receive experience: about 200,000 Base EXP; 300,000 and 300,000 and 250,000 Job EXP.
- Also receive 1 Damaged Weapon and 5 Cor Cores.
- A new quest mark will appear in minimap, go there and talk to Goni .
- Talk to Rookie to trigger a long scene, and then the team agreed to enter the Varmundt Mansion through the waterway.
- Go to the new quest mark in far northeast of the minimap and talk to Rookie .
- Receive experience 3 times, 400,000 Job EXP each. Also receive about 300,000 Base EXP.
- Cor Memorial repeatable Instance is available now.
- Finding Patrick sidequest is available now.
- Illusion Equipment and Enchant Modules are available for exchange now.
- Grace Equipment is available now (for level 150+).


This is the end of Illusion Episode Questline. The next quest chain is Episode 17.2: Legacy of the Wise One.
Side Quests
Finding Patrick
- Talk to Kaya Tos .
- He asks whether the adventurer also thinks of this place as an illegal lab. he talks about the relation of missing people in the list to this area, and asks us to go look for Patrick Kaufman.
- Talk to nearby Worker and ask if pats was there. everyone was re-assigned.
- Talk to Researcher near the farm . It turns out he was just there to grow super vegetables for animal food research.
- He recommends you talk to the laundry manager Worker who knows most of the people there and has been around longer.
- The laundry worker turns out to be Marcus Holtzman from lighthalzen. Ask him about Eva Meuler. You give him a chance to write a letter for his worried fiance. Afterwards, ask him about Patrick.
- Pats was also here but was a cleaner. Marcus says the only place left that the player can look for data about him is at the incineration plant.
- Receive 300,000 Base and Job EXP.
- Talk to the incineration plant Worker who is sorting documents at the northwest corner of the map.
- He doesn't know Patrick Kaufman, only Patrick Young. He mentions any other waste from the lab could've been moved out to an external site, including special cargo that could have been people.
- Proceed to the Laboratory Waste Disposal Site, Rudus Dungeon .
- Now at Rudus. Not knowing where to start, try searching Suspicious Trace close by, to the east of the entrance. While searching, suspicious voices are heard.
- Follow the voices to an Abandoned Person at . This location is beyond the wall that divides the upper third of the map from the bottom 2/3 of the map. The wall's effect on blocking paths can be seen on the minimap. Head to Rookie's position marked in red as he is next to the gate through the wall. Continue through the gate to find the source of the voice. This person turns out to be a researcher whose lab blew up. This coated her in chemicals and disfigured her. She confesses that they have been experimenting on people and that they are connected to the numerous disappearances throughout schwartz. Ask her about Patrick Kaufman.
- Fearing that he may already be dead, go look for Patrick's Test Subject Identification Bracelet.
Search through suspicious traces around the map (there are 5-6 areas). The location seems random:- /navi sp_rudus 55/137
- /navi sp_rudus 36/46
- /navi sp_rudus 221/165
- /navi sp_rudus 124/195
- /navi sp_rudus 332/235
- /navi sp_rudus 364/134
- Return to Kaya Tos at and show him the bracelet. The player receives 600,000 Base and Job EXP and 20x Cor Core.
- He asks the player for a favor, and relays them to Aas
To Rudus
- Talk to Aas. She asks us to give rest to 20 Dolors, and bring back 10x
 Identification Bracelet for Specimen.
The bracelets are obtained received directly into inventory from Dolors. - Return to Aas. receive 225000 base exp job exp 1x Cor Core, 5x Unknown Parts
- To Rudus repeatable quest is available now.
OS Occupation

- In Cor south side, have party leader talk to Erst to create the instance, then enter.
- Let NPCs talk until monsters spawn. Keep killing monsters until the radio npc begins glowing blue. Pick any Engaging option.
- Keep waiting until Erst's annoucement says: Party Leader's Name! Check Alpha team's coordinates! Talk to the radio again and choose any option.
- Keep waiting until meteors rain and the poison fog on the east disappears. Head southeast and follow this guide's map's path to the bottom left where Team Alpha is.
- Once the railway is in sight, start going southwest.
- Talk to the Team Alpha radio until it disappears.
- Follow the map's path north. Kill monsters that have spawned. Reach the 1st checkpoint, walk past it, and it'll disppear.
- Then keep going east onto the railway. Kill all monsters that have spawned. Once all are dead, the 2nd checkpoint appears.
- Walk past the checkpoint, it disappears, then follow the map's orange path south.
- Kill monsters that have spawned until the 3rd checkpoint appears.
- Go east, fight a very weakened Miguel, then talk to Erst to exit.
- Receive six chunks of 200,000 Base EXP and 180,000 Job EXP, a total of 1,200,000 Base EXP and 1,080,000 Job EXP.
- 2nd OS Search daily quest available.


Daily Quests
Visit Illusion Daily Quests.
Monsters List
| Name | Level | HP | Def | Mdef | Size | Element | Race | Appears in |
|---|---|---|---|---|---|---|---|---|
| Dolor | 122 | - | - | - | Medium | Poison 2 | Human | Rudus Dungeon (sp_rudus) |
| Venenum | 123 | - | - | - | Medium | Poison 2 | Brute | Rudus Dungeon (sp_rudus), (sp_os), Cor Memorial |
| Twin Caput | 125 | - | - | - | Medium | Shadow 2 | Human | Rudus Dungeon (sp_rudus) |
| Mutant Dolor | 173 | - | - | - | Medium | Poison 3 | Brute | Rudus Dungeon (sp_rudus2), (sp_rudus3) |
| High Hunter Bellare | 165 | - | - | - | Medium | Neutral 3 | Human | Rudus Dungeon (sp_rudus2), Cor Memorial |
| High Hunter Sanare | 168 | - | - | - | Medium | Shadow 3 | Angel | Rudus Dungeon (sp_rudus2) |
| Plaga | 164 | - | - | - | Medium | Neutral 2 | Dragon | Rudus Dungeon (sp_rudus2) |
| R48-85-Bestia (MVP) | 174 | 8,885,000 | - | - | Large | Neutral 4 | Brute | Rudus Dungeon (sp_rudus2) |
| Mutant Twin Caput | 175 | - | - | - | Medium | Shadow 2 | Human | Rudus Dungeon (sp_rudus3) |
| Mutant Venenum | 176 | - | - | - | Medium | Neutral 3 | Human | Rudus Dungeon (sp_rudus3) |
| Mutant Plaga | 178 | - | - | - | Medium | Neutral 3 | Dragon | Rudus Dungeon (sp_rudus3) |
| E-EA1-L | 116 | - | - | - | Medium | - | - | Cor Memorial |
| E-EA2-S | 117 | - | - | - | Medium | - | - | Cor Memorial |
| E-13EN0 | 118 | - | - | - | Medium | - | - | Cor Memorial |
| EL1-EA17T (MVP) | 118 | 16,412,000 | - | - | Large | Neutral 3 | Formless | Cor Memorial |
| Heart Hunter Bellare | 120 | - | - | - | Medium | - | Human | (sp_os), Cor Memorial |
| Heart Hunter Sanare | 120 | - | - | - | Medium | - | Angel | (sp_os) |
| A103-Capute | - | - | - | - | Medium | - | Human | 2nd OS Search |
| Miguel (MVP) | - | Varies | - | - | Medium | Wind 4 | Human | OS Occupation, 2nd OS Search |
| Traitor (Heart Hunter) | - | - | - | - | - | - | - | Regenschirm Instance |
| Fatal Pompom | - | - | - | - | - | - | - | Regenschirm Instance |
| Sorrow Crob (MVP) | 111 | 3,441,000 | - | - | Medium | Neutral 2 | Human | Regenschirm Instance |
Notes:
- Some monsters here can break equipment:
- Miguel MVP casts Bomb (Breaks Weapon)
- High Hunter Bellare casts Acid Terror (Breaks Armor)
- Some monsters inside the OS Occupation and Cor Memorial instances have a low chance to drop Mysterious Components and Cor Cores.
- The 2nd OS Search instance contains variants of Dolors, Heart Hunters Bellare, and Twin Caputs, of varying CP levels ranging from CP1 to CP6. These do not contribute to the daily hunting quests.